Workflow Process Management - Introducing Projects
Michiel Rop
2017-12-04

As part of version 12 of Bloomreach Digital Experience Platform (DXP) a feature called “Projects” has been introduced. The feature enables webmasters to collaborate on a set of isolated configuration changes.
In this lab post, I’ll cover some technical background related to starting a new project, and changing related configuration. In order to play around with this new functionality in step 1 to 4, I'll create a new project that includes this new feature and configure it to show a real-life example of using projects.
Workflow Process Management is an enterprise feature. That means that step 4 and 5 require an enterprise subscription. I've added some video’s and screenshots to make sure this lab post can be read as well without such a subscription.
Step 1: Set up a Bloomreach DXP project
Before I start with exploring the Workflow Process Management Feature I'll set up a clean project and keep all options default. In this lab post, I use the default project name “myhippoproject”.
Then I add the essentials Blogs, News and Events, Single Content, Banners and Images features by using essentials.
Step 2: Add prototype pages
In this step, I'll add a two column page prototype because we want to use this layout for our Christmas page in our Christmas project. I'll add configuration for the prototype page and template via the console and the actual template in the project.
Notice that the changes in the template in your project are reloaded immediately.
Since Bloomreach DXP 12 you can use YAML as the format to manage configuration and content. Notice that the console now has options to export and import YAML.
Add a two column prototype page.
Add the following configuration as subnode of /hst:hst/hst:configurations/myhippoproject/hst:prototypepages.
/two-column:
  jcr:primaryType: hst:component
  jcr:mixinTypes: ['hst:prototypemeta']
  jcr:uuid: 8f6ab62a-ca6d-4572-92f6-6d401d2bee80
  hst:displayname: Two Column Page
  hst:referencecomponent: hst:abstractpages/base
  /main:
    jcr:primaryType: hst:component
    jcr:uuid: 59beebe1-e958-4de2-b1ee-e028d4a2b95c
    hst:template: two-column-main
    /left:
      jcr:primaryType: hst:containercomponent
      jcr:uuid: 909f43a9-576a-4222-bfb6-7c557ae1c88b
      hst:label: Left Container (vBox)
      hst:xtype: HST.vBox
    /right:
      jcr:primaryType: hst:containercomponent
      jcr:uuid: 64f6b4b4-1237-405d-82c9-2621c49acf00
      hst:label: Right Container (vBox)
      hst:xtype: HST.vBox
Add the following configuration as subnode of : /hst:hst/hst:configurations/myhippoproject/hst:templates.
/two-column-main:
  jcr:primaryType: hst:template
  jcr:uuid: f5dfa6a6-e43c-4bb9-af01-227ae1ffd7d8
  hst:renderpath: webfile:/freemarker/myhippoproject/two-column-main.ftl
Add a template called two-column-main.ftl to your project:
<#include "../include/imports.ftl">

<div class="col-xs-8">
<@hst.include ref="left"/>
</div>
<div class="col-xs-4">
<@hst.include ref="right"/>
</div>
If you restart your project you should be able to add a new page with a two column layout.
Step 3: Add users
- Add a new user called Mandy, she should be added to groups editor and webmaster.
- Add a user called William, he should be added to the group editor.
- Add a user Bart, he should be added to group editor and webmaster.
Step 4: Add the project feature
To be able to add the “Projects” feature you have to change the project to an enterprise project. Now, you are going to add the “Projects" feature.
Step 5: The first steps with a Project
Now that you are all set, you are able to have a look at the new “Workflow Process" feature.
Mandy wants to create a new Christmas page with a link to it from the homepage, therefore She creates a new project:
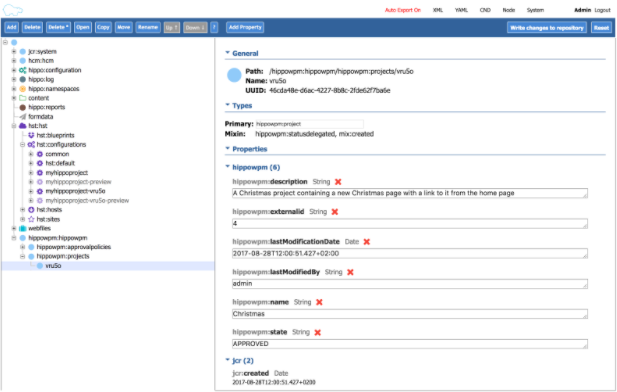
When looking carefully at the project in the console (http://localhost:8080/cms/console) a few thing are noticable:
- The workspace of the “Core” project has been copied to the new project (with the project ID as suffix) and its preview node.
- A new project node has been created under hippowpm:projects.
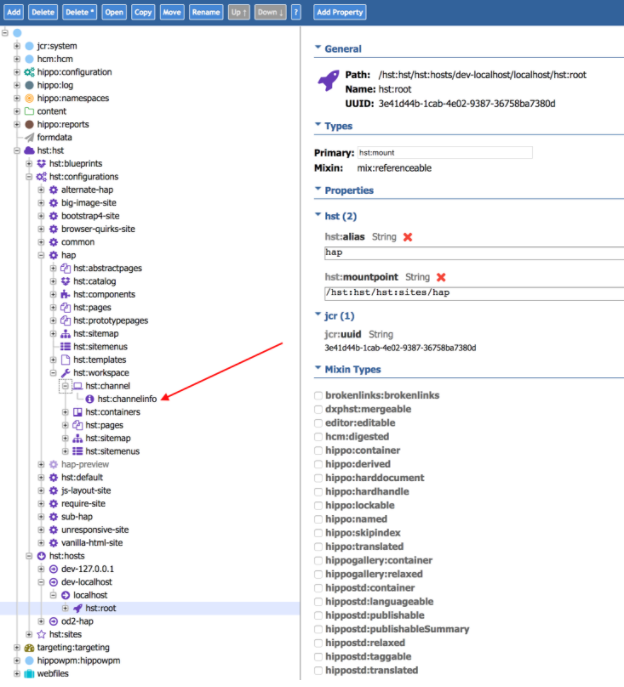
- The workspace now also contains channelinfo.

In order to facilitate Workflow Process Management the channel info node has moved.
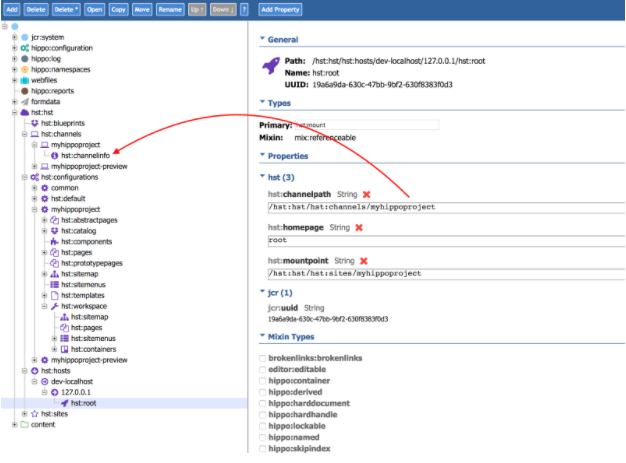
Channel Info in Bloomreach with version < 12.0
The channel node used to be a subnode of channels. The mount referred to the hst:channelinfo node.

Channel info in Bloomreach version >=12.0
The Channel info is now part of the workspace. This allows previewing channel specific changes.
It also makes it possible to change these configuration parameters as part of a project.

William logs in into the cms and adds a Christmas document and a Christmas image:
Bart adds a two column page and adds the document and the image William created.
Mandy logs in, has a look a the changes and accepts the changes:
The changes are isolated from the “Core” project.
Now that Mary has accepted these changes they can be merged into the “Core”, so that they will be visible on the public web site.
This concludes my short introduction to the "Projects" feature. I hope you found it helpful and give it a spin sometime.

