Create a Custom Image Set

Hippo CMS stores several variants of each uploaded image. All variants of an image are together called an image set, and can be seen in the image gallery in the CMS. The default image set contains only two image variants: the original image, and a small thumbnail that is used in the CMS in listings and pickers.
The default image set type is hippogallery:imageset. Besides the original and thumbnail variants, this type also stores size information (width and height) for each image in the set. In addition, the original file name is stored.
The default image set can be extended with more scaled variants of each uploaded image. It is even possible to create multiple, different extensions of the default image set that each contain a different set of scaled variants. Having multiple custom image sets can be useful if not all uploaded images need to generate all scaled variants, e.g. when parts of the image gallery are only used by specific channels that only render certain image variants.
Do Not Change Thumbnail Dimensions
The standard 'thumbnail' variant is used by the CMS, changing its dimensions or other configuration properties can cause issues. A custom thumbnail variant should be created for use on the site.The following example creates a custom image set that contains an additional 'preview' variant of the image of at most 640x480 pixels.
1. Subtype the base type
Add a custom image set type to your project's .cnd file. Example:
<'hippogallery'='http://www.onehippo.org/jcr/hippogallery/nt/2.0'>

[myproject:myimageset] > hippogallery:imageset, hippogallery:relaxed
There are two options to get this changed CND into your local development repository:
- Rebuild and restart your project with a clean repository
- Select 'CND Import' in the top of the console and import your .cnd file
Verify with 'CND export' that the type myproject:myimageset is now used by the repository.
To make sure the .cnd file is also re-imported in existing repositories (e.g. on your production server), add a reloadonstartup property to the initialize item for the .cnd file in the hippoecm-extension.xml file.
2. Create a document type for the new imageset
The new imageset needs a custom document type. Unfortunately, the document type editor cannot be used here since it does not support inheritance from types in different namespaces. The easiest way to create the document type is therefore to copy the hippogallery:imageset document type definition in the console, and add/change the right properties and nodes in there. As an example, we're going to create an imageset called myimageset with an additional image variant called preview.
-
In the console, copy the node
/hippo:namespaces/hippogallery/imageset
to
/hippo:namespaces/myproject/myimageset
-
Change the supertype of the copied imageset. In the node
/hippo:namespaces/myproject/myimageset/hipposysedit:nodetype/hipposysedit:nodetype
set the multiple property hipposysedit:supertype to the values hippogallery:imageset and hippogallery:relaxed. Also set the property hipposysedit:uri to the URI of your project's namespace (see the .cnd file).
-
Add a nodetype definition to the myimageset document type. In the node
/hippo:namespaces/myproject/myimageset/hipposysedit:nodetype/hipposysedit:nodetype
copy the node original to preview and change its property hipposysedit:path to myproject:preview.
-
Add a template definition to the myimageset document type. In the node
/hippo:namespaces/myproject/myimageset/editor:templates/_default_
copy the node original to preview and change its property field to preview. Also change the property caption to Preview.
-
Change the primary type of the prototype node of the new image set: select the node
/hippo:namespaces/myproject/myimageset/hipposysedit:prototypes/hipposysedit:prototype
and change its primary type to myproject:myimageset.
-
Next, we have to add the new variant to the prototype of the new imageset. In the node
/hippo:namespaces/myproject/myimageset/hipposysedit:prototypes/hipposysedit:prototype
copy the node hippogallery:original to myproject:preview.
-
Finally, we have to provide translations for the new image set. Translations for image sets are maintained in a similar fashion as for document types using repository resource bundles. To create translations for myimageset, copy or recreate the node structure below
/hippo:configuration/hippo:translations/hippo:types/hippogallery:imageset
at
/hippo:configuration/hippo:translations/hippo:types/myproject:myimageset
You'll need to re-create all properties in the myproject namespace. These labels are used both in the gallery picker when selecting a specific image variant as well as in the image editor. Similar to document types, translations for the image set name can be provided in the jcr:name property.
-
Save your changes
3. Configure the queries used to create a new image in the gallery
In the console, go to the node
/hippo:configuration/hippo:queries/hippo:templates/new-image-folder/hippostd:templates/image gallery
Change the property hippostd:gallerytype to myproject:myimageset. Also change this property in all existing folder nodes below /content/gallery to ensure that the new imageset will also be used in existing gallery folders.
To adapt this query while bootstrapping the repository, import the following delta XML at the right node (e.g. /hippo:configuration/hippo:queries/hippo:templates/new-image-folder/hippostd:templates):
<sv:node xmlns:sv="http://www.jcp.org/jcr/sv/1.0"
          xmlns:h="http://www.onehippo.org/jcr/xmlimport"
         sv:name="image gallery" h:merge="combine">
  <sv:property sv:name="hippostd:gallerytype" sv:type="String"
               h:merge="override">
    <sv:value>myproject:myimageset</sv:value>
  </sv:property>
</sv:node>
4. Configure the gallery processor
All image variants in an image set are created by the gallery processor. When adding a new image variant, the gallery processor should be told what size to scale the original image to.
The configuration of the gallery processor resides under the node
/hippo:configuration/hippo:frontend/cms/cms-services/galleryProcessorService
Each image variant is configured as a child node with the same name as the property in the CND (in our example: myproject:preview). Two nodes already exist: hippogallery:original and hippogallery:thumbnail, for the original and thumbnail variant. Each child node contains the following properties:
- width and height
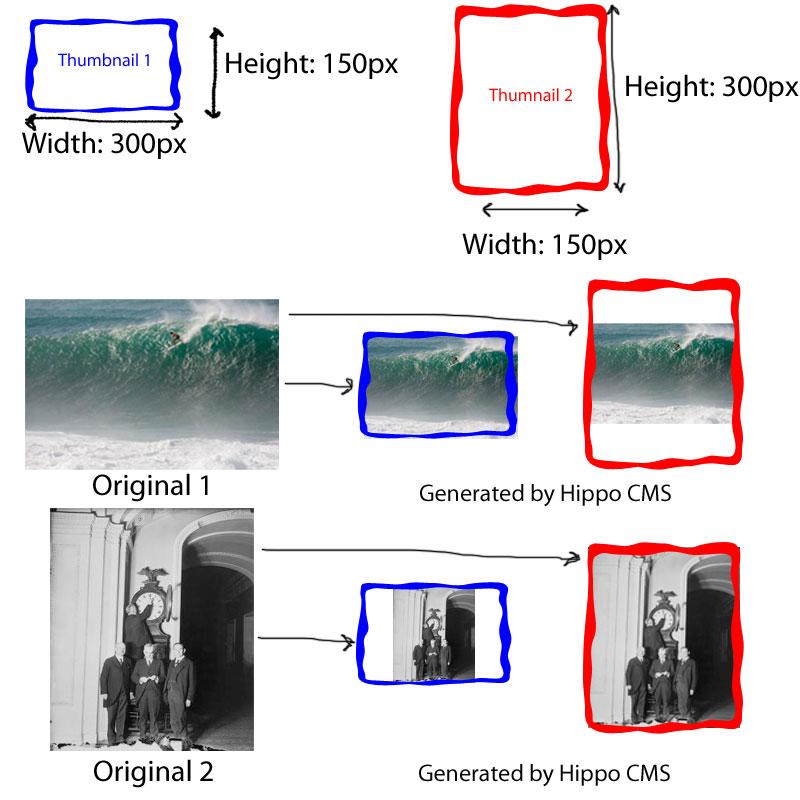
The size of a bounding box in pixels. The original image is scaled such that it fits in this bounding box while maintaining the original aspect ratio. A width or height of 0 or less means "unbounded", and results in a bounding box that does not restrict scaling in either the width or height, respectively. When both width and height are 0 or less, the image is not scaled at all but merely copied. The default width and height is 0.
Setting width & height to zero is not supported by the cropping functionality, since it breaks the UI display of the image variant. - upscaling
Whether to scale images up that are smaller than the specified bounding box. Its value can be true or false. The default value is false.
- optimize
The scaling optimization strategy. Possible values are:
-
speed
-
speed.and.quality
-
quality
-
best.quality
-
auto
The default is quality. These settings relate to methods SPEED, BALANCED, QUALITY, ULTRA_QUALITY and AUTOMATIC from Scalr.Method.
-
- compression
The compression quality to use when writing the scaled image data, specified as a double between 0 and 1. The lower the value, the higher the compression. The default compression quality is 1, meaning 'no compression'. Note that compression quality is only taken into account for JPEG images. Lossless image formats (like PNG) will simply ignore the compression quality.
Example:
The following image gives an idea of how setting the width and height works with 2 example bounding boxes (red and blue) and 2 example original images. Note that Hippo CMS doesn't add white space in thumbnails, so the generated thumbnails will usually be in various sizes:

For the example 'preview' image version, copy the child node hippogallery:thumbnail to myproject:preview and set the following properties:
- width = 640
- height = 480
5. Use the custom image set in your HST site
To use the custom image set in your HST site, create a Java bean for it. For example:
@Node(jcrType = "myproject:myimageset")
public class MyImageSet extends HippoGalleryImageSet {

    public HippoResourceBean getPreview() {
        return getBean("myproject:preview");
    }
}
A document bean can then return the custom image set bean in a getter method. For example, a document with a field 'logo' could have a 'getLogo' method that returns the custom image set:
public MyImageSet getLogo() {
    return getLinkedBean("myproject:logo", MyImageSetBean.class);
}
6. Tweak the URLs of image variants
By default, the URLs for the 'preview' variant of a 'logo.jpg' image would be something like /binaries/content/gallery/mysite/logo.jpg/logo.jpg/myimageset:preview. With some additional configuration this URL can be changed to, for example, /binaries/preview/content/gallery/mysite/logo.jpg. Such URLs can be created by the HST by configuring custom resource containers.
Related notes
Some things to be aware of while working with images:
Cropping images from within imageset editor
The built-in image cropper provides for each variant the ability to select a portion of the original image and crop around that. The dimensions ratio used for the cropping operation is fixed and calculated from the variant's dimensions. With respect to the upscaling property specified for each variant, the cropper may not allow crop selections smaller than the thumbnail variant size, effectively preventing upscaling of the cropped region. This is an extension to the normal cropper behavior, which out of the box supports all features of the YUI Image Cropper. Documentation about this can be found at the YUI website.

