Deploy a Project Distribution
Introduction
Goal
Deploy a project distrubution in a Tomcat installation in an environment.
Background
At the end of a development iteration the development team will package their project as a distribution that is ready for deployment in a test, acceptance or production environment. This page explain how to deploy such a distribution in a Tomcat installation in an environment.
Deployment Diagram
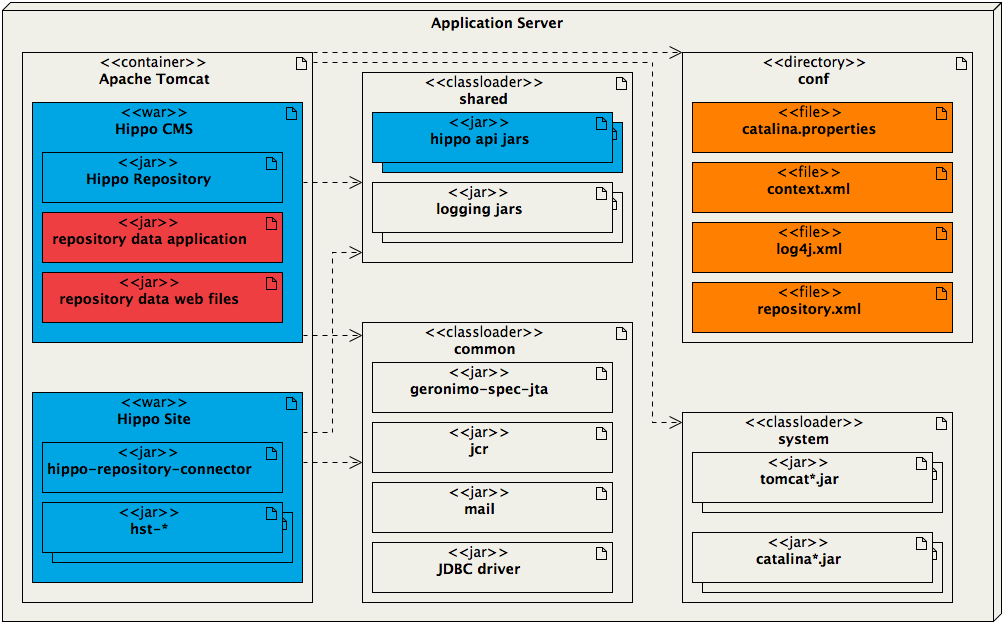
The distribution file contains a generic directory structure aimed at deployment in a default Tomcat installation, as depicted in the following diagram:

In practice, when following our best practices (see next paragraph), only the Hippo out-of-the-box elements (blue in the diagram above) and project-specific elements (red) in the distribution are deployed. Generic (grey) and environment-specific (orange) element are configured at container level. The instructions below reflect this best practice.
Prerequisites
Prior to the first deployment in an environment, that environment must be prepared following the available documentation:
- Application Server (this page assumes our preferred setup, Apache Tomcat on Linux)
- Database
- Web Server / Reverse Proxy
Deploy the Project Distribution
Assuming the environment has been prepared properly following our documentation (see previous paragraph), the actual deployment of the application involves the following steps.
- Upload the distribution to the server.
-
Become the user under which the application runs (cms if you followed our documentation):
su - cms
-
If Tomcat is running, stop it:
/etc/init.d/cms stop
-
Unpack the distribution inside the root directory of the Tomcat installation:
cd ~/tomcat
tar -xzf /path/to/download/location/myproject-<VERSION>-distribution.tar.gz webapps shared
Note that we explicitly specify only the shared and webapps directories to be extracted. This is because everything else has already been configured at container level (see above) and we don't want to overwrite anything. -
And finally, (re-) start Tomcat:
/etc/init.d/cms start
This first start could take a while as the database and content repository get populated.During a first deployment, the (still empty) content repository is always bootstrapped using the project's bootstrap data. Make sure to create a distribution with bootstrap content for the first deployment.
However, it is important to note that on subsequent deployments, in an environment set up following out documentation, repository bootstrap is disabled by default. If a CMS upgrade or new project release requires new content to be bootstrapped into the repository this must be enabled by (temporarily) modifying the bin/setenv.sh script in the Catalina Base directory: in the REP_OPTS variable change -Drepo.bootstrap=false to -Drepo.bootstrap=true.
Don't forget to revert the changes to bin/setenv.sh after the release has been deployed.
Next Step
After the first deployment in an environment, the application must be configured for that environment as well.

