Using the Essentials Setup Dashboard
Introduction
The Essentials setup dashboard is a web application intended to help you quickly set up the basic structure and main features of your new Bloomreach Experience Manager project. If you started the project from the archetype, the dashboard is automatically built and deployed locally. When the project is running, the dashboard is available at
http://localhost:8080/essentials
The dashboard is intended for use on the development host only. Once you deploy your project to a test, acceptance or production server, you will no longer use the dashboard.
When you're dealing with a Bloomreach Experience Manager project that was not set up using Essentials (for example, because the project has been upgraded from an earlier Bloomreach Experience Manager version), you can still take advantage of some of the features offered by the setup application.
About Plugins
When working with the Dashboard, you should be aware of two types of plug-ins:
- Bloomreach Experience Manager plugins are plugins that add extra functionality to your project’s CMS and/or site web application. They can be pulled into your projects by installing the corresponding feature in the setup application, or by manually adding the appropriate dependencies to your project.
- Dashboard plugins are plugins that add extra functionality to the setup dashboard. Once a dashboard plugin is installed in the dashboard, you can use it to add extra functionality to your project.
A Bloomreach Experience Manager plugin may have its own dashboard plugin, but in general, a dashboard plugin can add any kind of functionality to the dashboard, using none, one or multiple Bloomreach Experience Manager plugins.
Installing Plugins
When installing plugins in the Essentials setup dashboard, you will need to rebuild and restart your project regularly. The dashboard indicates this need in the upper right corner. There are two main reasons for the need to rebuild your project:
- When you want to use a new dashboard plugin available on the Marketplace, that plugin needs to be installed into the dashboard. Only after re-building the dashboard can the dashboard plugin be used to modify the project.
- When a dashboard plugin changes the content of any of your project's web applications, the affected WAR packages need to be rebuilt and redeployed to effectuate the changes.
First visit to the Dashboard
When you first visit the Essentials setup dashboard at http://localhost:8080/essentials, you get to see a Welcome page. On this page, you're asked to specify a few global project parameters, which will be available to and used by Dashboard plugins in order to appropriately register new project features and configure the project.
Clicking on Get Started brings you to the plugin Library, from where you can start adding features to your project.
Effect on your project
When you use Essentials to configure your project, the dashboard web application executes code to apply changes to your project. There are two types of changes you should be aware of:
- Changes to your project files. Dashboard plugins may create new project files, or adjust existing ones.
- Changes to your local repository. Dashboard plugins may write changes to your project's local JCR repository. In order to preserve these changes for rebuilding a new, clean repository, they need to be exported into your project’s repository-data modules. This happens automatically by means of the auto export functionality, which is enabled for new projects by default.
We recommend making use of your VCS functionality to detect changed and new files in your project. This will help you monitoring the effect of your dashboard actions on your project, and troubleshooting when things don’t behave the way you expect them to.
We also recommend regular check-ins of your project to assist you in undoing changes that turn out to be unwanted.
Returning to the Dashboard
Once you have completed the basic set-up of your project, you can return to the dashboard and continue using its plugins to add more features to your project, or to fine-tune the configuration for certain dashboard plugins.
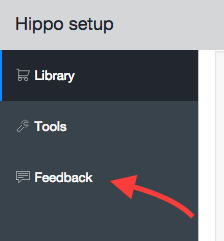
While the dashboard intends to help you with the majority of your project features, there will come a moment when the dashboard lacks support for what you would like to achieve. At that moment, we are glad to hear from you what you would like to achieve, such that we can add new, useful plugins to the dashboard. We've built a feedback mechanism into the dashboard for this purpose.

But for now, it’s time to say goodbye to the dashboard and consult the Bloomreach Experience Manager Documentation and Bloomreach Experience Manager Community for more information on how to achieve your goal. Apart from creating new dashboard plugins, we also provide a list of tutorials on how to implement common features not yet supported by the dashboard.

