Style the buttons on the dashboard
This guide will show you how to implement a custom style for the left panel column on the dashboard. This is especially useful if there are a lot of custom buttons that all stack up vertically. Those buttons can be a bit smaller and might benefit from different icons to clarify the purpose of each button. If we make them smaller we can also use the white space to place two buttons next to each other, and save some more vertical space.
Create the css file
First we have to set up a custom CSS file for the CMS. Create a new file at:
cms/src/main/resources/skin/myskin.css
And add the following CSS to it:
.hippo-perspective-dashboard-panel.left {
    background-color: papayawhip;
}
Rebuild and restart your project to make the changes effective. You can verify the file was correctly packaged and is accessible by opening http://localhost:8080/cms/skin/myskin.css in your browser.
Configure CSS file
Next we need to configure the CMS to load the new CSS. Using the Bloomreach Experience Manager Console, navigate to node:
/hippo:configuration/hippo:frontend/cms/cms-static/root
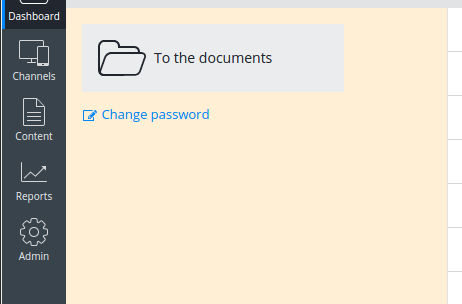
Add a String property named wicket.skin and set its value to skin/myskin.css which, as you probably already have guessed, is the relative path from folder cms/src/main/resources to the CSS file. Login to the CMS and if everything went OK the left panel of the dashboard will have a beautiful papayawhip background color. (You might have to logout and login to see this change)
Style the left panel
Change the large buttons
Open file myskin.css and replace our initial background-color style with the following:
.hippo-perspective-dashboard-shortcuts > div {
  width: 50%;
  float: left;
}
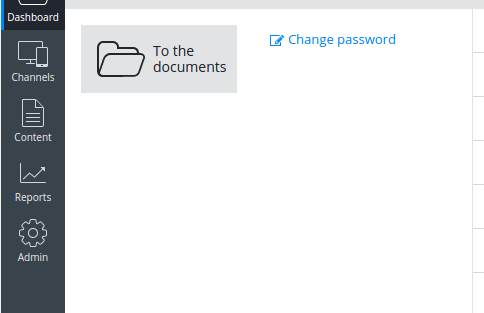
This will resize the button to a smaller version and set a width of 50% on all the items in the left panel, which, together with float:left, creates nice rows with two columns.
To see this change in the CMS we have to make sure our newer version of myskin.css is reloaded by the application. A simple refresh won’t do, unless you have built the project using JRebel. In that case a simple recompile of the folder cms/src/main/resources/skin will copy the file to the target directory where it is picked up by JRebel and served the next time you refresh the browser. Otherwise you will have to rebuild and restart the project.
Change the icons
The icons of the smaller links, like ‘Change password’, can also be changed with a little CSS. In this example we will replace the 'edit' icon with this papaya icon. To add the image we create a new folder cms/src/main/resources/skin/images/myskin and add the file to it.
Open the CSS file once more and add the following:
.hippo-perspective-dashboard-shortcuts .quick-link {
  padding-left: 20px;
  background: url(images/myskin/papaya-icon.png) left center no-repeat;
}

.hippo-perspective-dashboard-shortcuts .quick-link svg {
  display: none;
}
These rules hide the original SVG icon of the 'quick links', and show the papaya icon as a background of the link instead.
Rebuild and restart the project and upon login the screen should contain at least one papaya icon. Here is the result:
![]()