Get Started with React
Overview
In this tutorial, we will create a React app consuming Page Model JSON API based on a standard Bloomreach Experience Manager project. The React app will read component metadata, models and content items to render Banner components, which are dynamically added and removed in Channel Manager.
Create a Bloomreach Experience Manager Project
First, create a Bloomreach Experience Manager project by following Get Started. Add features to the project through Essentials: Banners, Events and News at least. See Add Features to the Project for detail.
Add Example Banner to Homepage
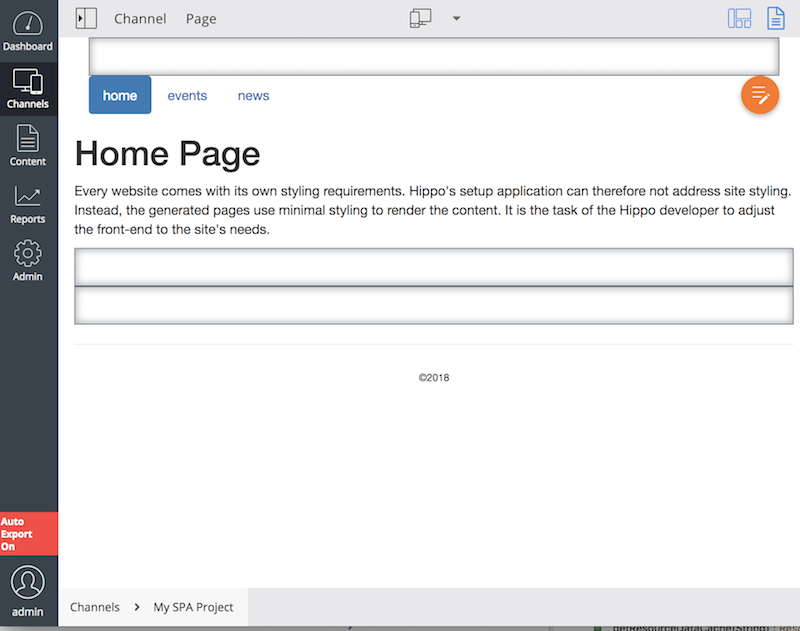
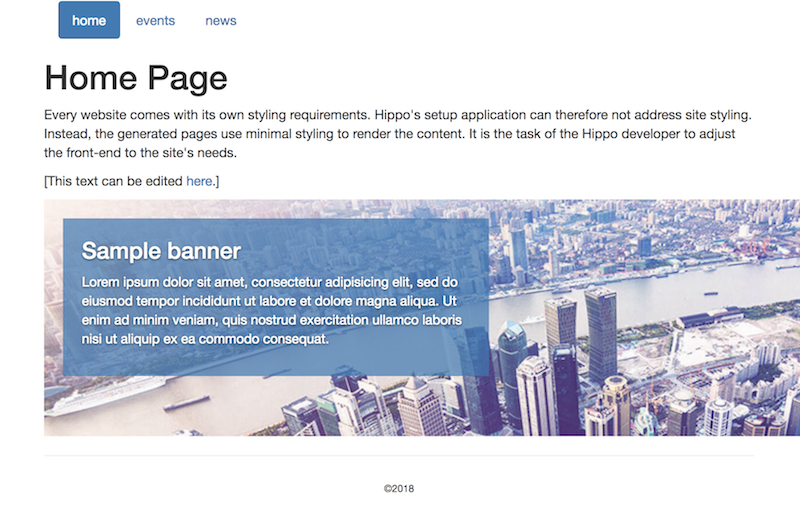
We need to add a Banner component in the Channel Manager for our demo. Open the Channel Manager to edit the default channel.
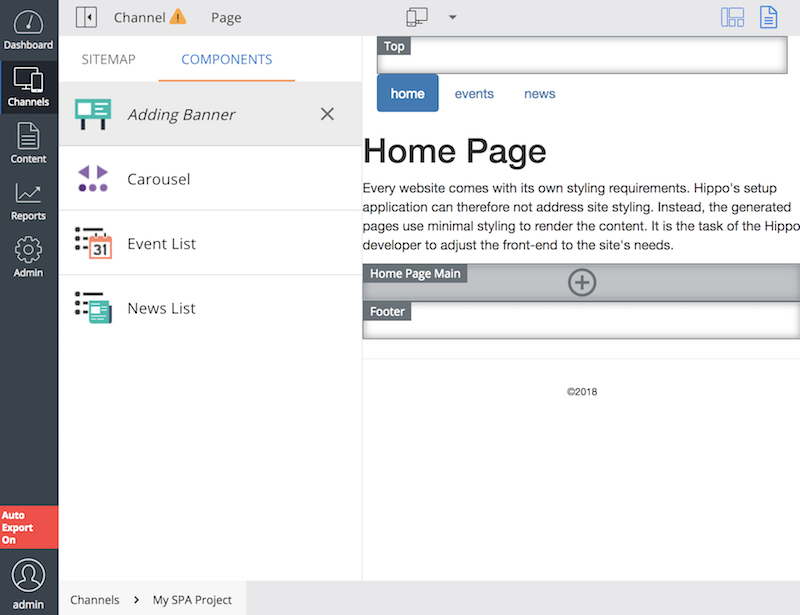
Select the Home Page Main container and add Banner component there.
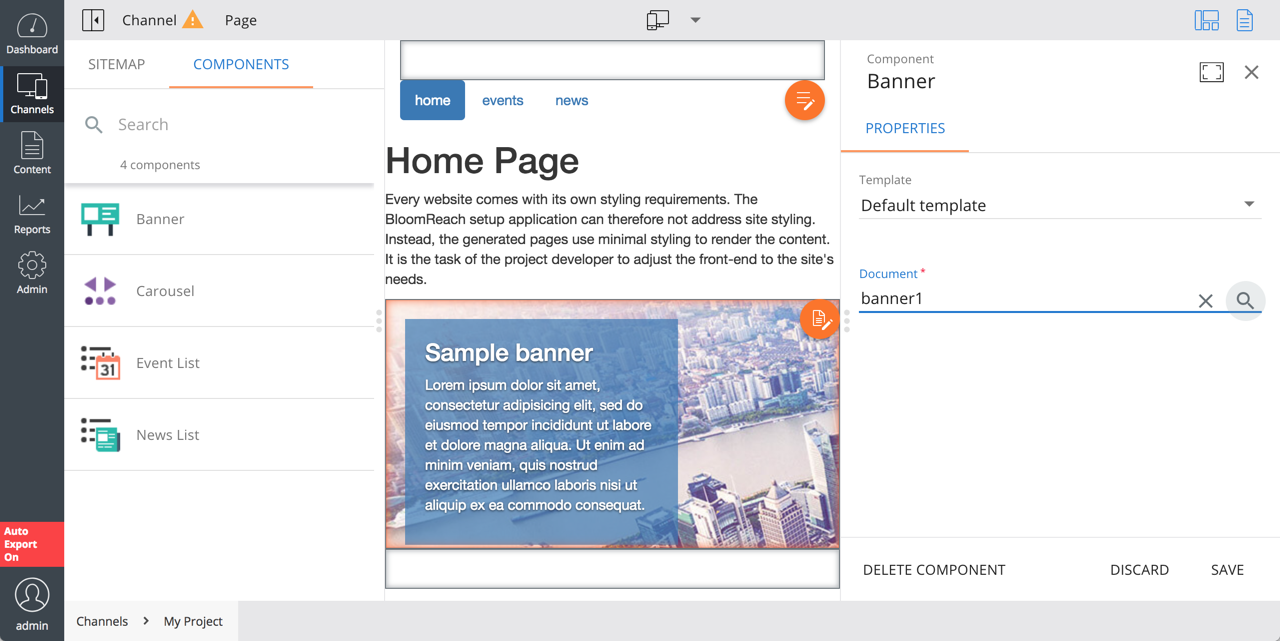
Open the Parameter Setting dialog on the Banner component you've just added, and select a Banner document. e.g, banners/banner1.
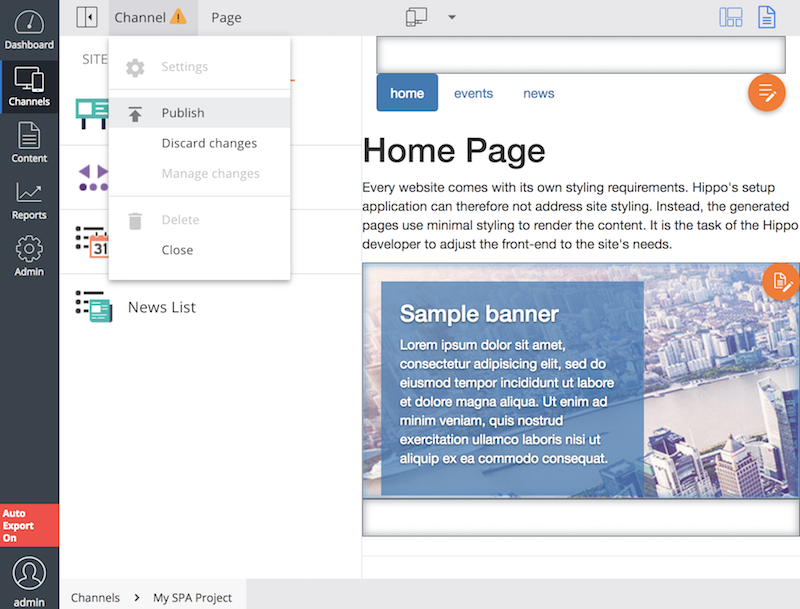
Publish the channel.
If you visit http://localhost:8080/site/, then the homepage will show the Banner component content:
We will convert the channel to an SPA Site Channel in the following step.
Configure SPA Site and Page Model API
In the hst:root mount for the default channel, configure the following properties:
/hst:myproject/hst:hosts/dev-localhost/localhost/hst:root:
  # SNIP
  hst:namedpipeline: SpaSitePipeline
  hst:pagemodelapi: resourceapi
  hst:responseheaders: ['Access-Control-Allow-Origin: http://localhost:3000', 'Access-Control-Allow-Credentials: true']
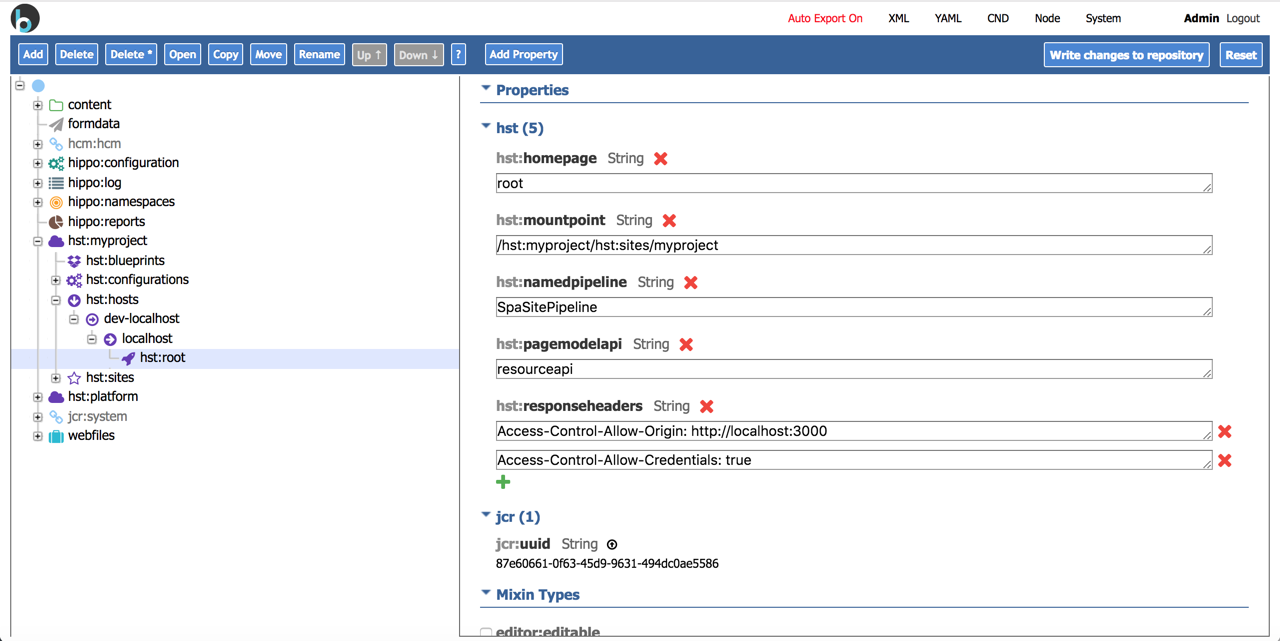
We've converted the root mount to an SPA Site Mount and set the mount path of Page Model JSON API to resourceapi. See Configure SPA++ for detail.
Also, we set CORS response headers (['Access-Control-Allow-Origin: http://localhost:3000', 'Access-Control-Allow-Credentials: true']) in order to allow a React node.js server (at http://localhost:3000) to consume Page Model JSON API (at http://localhost:8080/site/resourceapi/). This is very helpful in local development environment.
After writing changes to repository, you will be able to see Page Model JSON API working at http://localhost:8080/site/resourceapi:
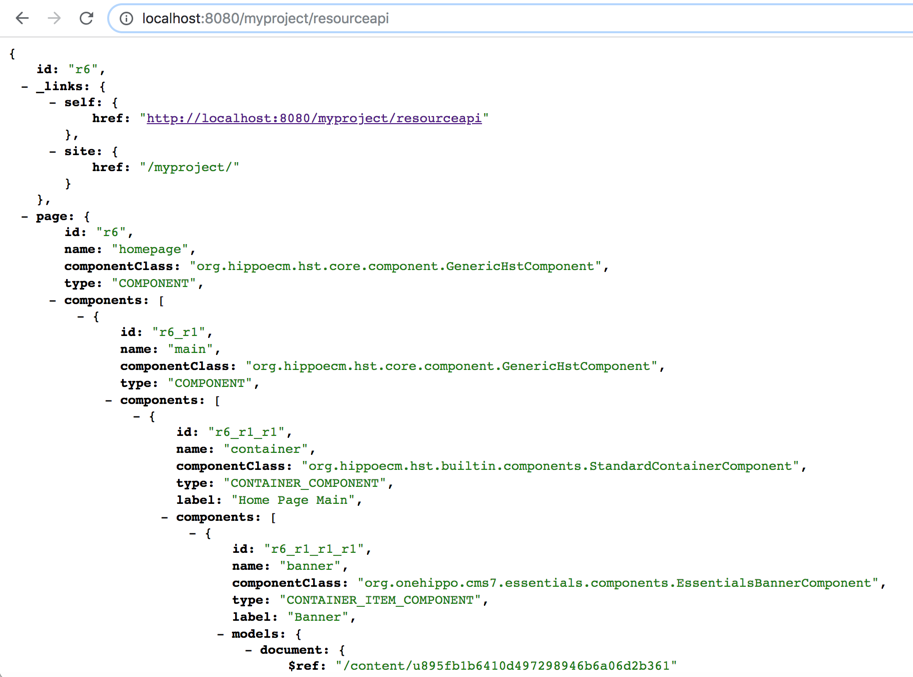
We've just completed setting up a SPA Site Channel and its Page Model JSON API mount.
Create React App
Now, let's create a React app. In a command line console, move to your Bloomreach Experience Manager project's root folder, and create a React app using the following command (see Create React App for detail):
$ npx create-react-app myapp
At the moment this document is being written, it creates a React app with the following dependencies as shown in package.json:
{
  "name": "myapp",
  "version": "0.1.0",
  "private": true,
  "dependencies": {
    "react": "^16.3.2",
    "react-dom": "^16.3.2",
    "react-scripts": "1.1.4"
  },
  "scripts": {
    "start": "react-scripts start",
    "build": "react-scripts build",
    "test": "react-scripts test --env=jsdom",
    "eject": "react-scripts eject"
  }
}
The dependencies will probably change as time goes by, but the main principles in this document will apply almost the same.
Our React app was created in a myapp subfolder under the Bloomreach Experience Manager project root folder. You can start the React app using yarn start in the myapp subfolder:
$ cd myapp
$ yarn start
This will open the React app at http://localhost:3000/ in your default browser automatically. The React app will show a welcome message for now. We will improve the React app to consume Page Model JSON API in the following sections.
Update App Class to Render State
Let's refactor the default App class in myapp/src/App.js a little bit to render the title and introduction from the state. We will update the state dynamically in the next section, but let's hard-code the state data for now and let the JSX elements read the state data like the following:
import React, { Component } from 'react';
import logo from './logo.svg';
import './App.css';

class App extends Component {

  constructor() {
    super();
    this.state = {
      name: "home",
      title: "Home Page",
      introduction: "Every website comes with its own styling requirements.",
      aggregatedPageModel: {},
      containerItemComponents: []
    };
  }

  render() {
    return (
      <div className="App">
        <header className="App-header">
          <img src={logo} className="App-logo" alt="logo" />
          <h1 className="App-title">{this.state.title} ({this.state.name})</h1>
        </header>
        <p className="App-intro">
          {this.state.introduction}
        </p>
      </div>
    );
  }
}

export default App;
This change will update the SPA page at http://localhost:3000/ automatically, showing the new title, "Home page (home)", and new introduction.
Fetch Dyanamic Data to Update State
The page still shows hard-coded title, name and introduction at the moment. Let's try to consume the dynamic content from Page Model JSON API. Add componentDidMount() function like the following:
import React, { Component } from 'react';
import logo from './logo.svg';
import './App.css';

class App extends Component {

  constructor() {
    super();
    this.state = {
      name: "home",
      title: "Home Page",
      introduction: "Every website comes with its own styling requirements.",
      aggregatedPageModel: {},
      containerItemComponents: []
    };
  }

  render() {
    return (
      <div className="App">
        <header className="App-header">
          <img src={logo} className="App-logo" alt="logo" />
          <h1 className="App-title">{this.state.title} ({this.state.name})</h1>
        </header>
        <p className="App-intro">
          {this.state.introduction}
        </p>
      </div>
    );
  }

  componentDidMount() {
    fetch('http://localhost:8080/site/resourceapi/')
    .then(results => results.json())
    .then(data => {
      this.setState({
        name: data.page.name,
        aggregatedPageModel: data,
        containerItemComponents: data.page.components[0].components[0].components
      });
    })
  }
}

export default App;
When componentDidMount lifecycle method is executed, the component was already rendered with the render() method, but the component would render itself again when the states are updated by the feched data through setState(...). In the above example, it sets name, aggregatedPageModel and containerItemComponents properties through #setState(...) from the JSON response. As a result, the render() method will be re-invoked after fetching the dynamic data from http://localhost:8080/site/resourceapi/.
As we didn't render any components such as the Banner component, this improvement wouldn't make a big difference yet, except of changing the title from "Home page (home)" to "Home page (homepage)". "home" is a hard-coded string whereas "homepage" is read from the the Page Model JSON API dynamically.
Add Banner Component
Now let's add the Banner React component which reads and renders the Banner component and associated content. Update myapp/src/App.js like the following:
import React, { Component } from 'react';
import logo from './logo.svg';
import './App.css';

class BannerComponent extends Component {

  render() {
    const bannerDocRef = this.props.component.models.document.$ref.replace(/^\/content\//, '');
    const bannerDoc = this.props.aggregatedPageModel.content[bannerDocRef];
    const imageRef = bannerDoc.image.$ref.replace(/^\/content\//, '');
    const imageDoc = this.props.aggregatedPageModel.content[imageRef];
    const imageSrc = 'http://localhost:8080' + imageDoc._links.site.href;

    return (
      <div>
        <h2>{bannerDoc.title}</h2>
        <div>
          <img src={imageSrc} />
        </div>
      </div>
    );
  }
}

class App extends Component {

  constructor() {
    super();
    this.state = {
      name: "home",
      title: "Home Page",
      introduction: "Every website comes with its own styling requirements.",
      aggregatedPageModel: {},
      containerItemComponents: []
    };
  }

  render() {
    return (
      <div className="App">
        <header className="App-header">
          <img src={logo} className="App-logo" alt="logo" />
          <h1 className="App-title">{this.state.title} ({this.state.name})</h1>
        </header>
        <p className="App-intro">
          {this.state.introduction}
        </p>
        <div>
          {
            this.state.containerItemComponents.map((containerItemComponent) => {
              return <BannerComponent aggregatedPageModel={this.state.aggregatedPageModel} component={containerItemComponent} />;
            })
          }
        </div>
      </div>
    );
  }

  componentDidMount() {
    fetch('http://localhost:8080/site/resourceapi/')
    .then(results => results.json())
    .then(data => {
      this.setState({
        name: data.page.name,
        aggregatedPageModel: data,
        containerItemComponents: data.page.components[0].components[0].components
      });
    })
  }
}

export default App;
In this updated example, we did the following:
- In App#componentDidMount() method, it sets aggregatedPageModel state property to the whole JSON model, and sets containerItemComponents state property to the first container component's child components only, for simplicity in this demo application.
- In App#render() method, it creates BannerComponent objects to render.
- BannerComponent class' render() method reads its component metadata and models and referenced content items, and finally renders the banner title and banner image element.
You may also want to adapt myapp/src/App.css a bit so that the standard React header doesn't fill up the entire page:
.App {
  text-align: center;
}

.App-logo {
  height: 10vmin;
}

.App-header {
  background-color: #282c34;
  display: flex;
  flex-direction: column;
  align-items: center;
  justify-content: center;
  font-size: calc(10px + 2vmin);
  color: white;
}

.App-link {
  color: #09d3ac;
}
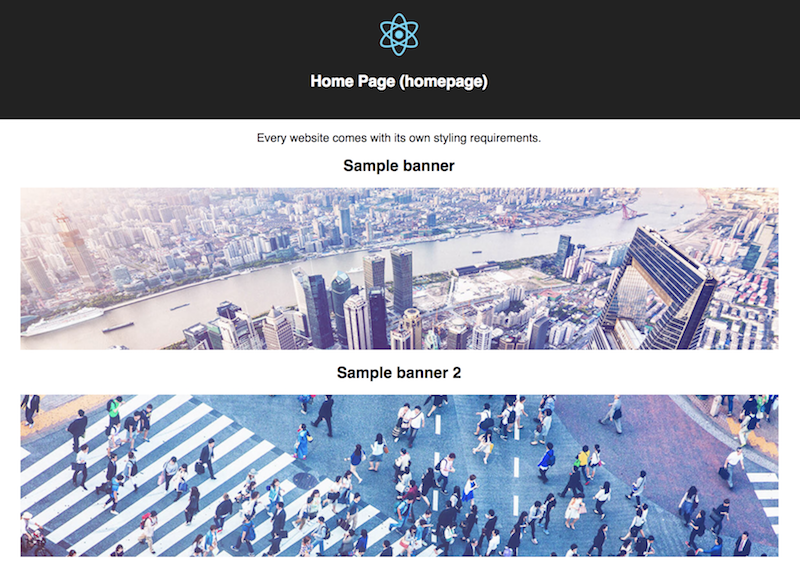
As the BannerComponent objects are added dynamically depending on the containerItemComponents state property, if you add one more Banner component in Channel Manager, the React app will update the page with two Banner components automatically as well:
More Advanced Examples
We have learned how to develop a React SPA which consumes the Page Model JSON API and renders content dynamically with Banner component examples.
This example could look too simple, but you may apply similar approaches in your project by adding more specified React components for News or Events components. Furthermore, you may consider adding React components for a generic HST Container Component or Container Item Component to reflect the real structure of HST page and components.
Also, if you need a seamless integration with the Channel Manager SPA API, you will need more considerations in each React component rendering.
For more details on those advanced topics, see Demo Projects which contains all the examples to cover the cases mentioned above.