Develop a New Commerce Connector
Introduction
Goal
Learn how to develop and test a commerce connector module.
Overview
In this tutorial, you will create a basic commerce connector module, for learning and demonstration purpose, which reads product and category data from a static JSON resource file and performs basic operations for customer and cart managements with simple in-memory data storages.
In addition to implementation code, you will also write unit test code for a better quality and self-validation at module level.
Finally, you will learn how to perform an integration test with the commerce connector module by dropping and registering the module in the Bloomreach Accelerator: B2C Commerce Boot project.
Source of Demo Commerce Connector Module Project
You can find all source files listed on this page in the Demo Commerce Connector Module project located at https://github.com/onehippo/demo-commerce-connector. You may clone, build, and test the examples as follows:
$ git clone https://github.com/onehippo/demo-commerce-connector.git
$ cd demo-commerce-connector
$ mvn clean install
The last command will compile, perform unit tests, package the JAR module, and install the module to your local Maven repository.
Structure of Commerce Connector Module Project
A Commerce Connector Module must be packaged in a JAR module as an HST Addon Module, so that Bloomreach Accelerator: B2C Commerce Application may discover the module and recognize its CommerceRepository components. An HST Addon Module must define its module and Spring Bean Assembly locations through the module descriptor at META-INF/hst-assembly/addon/module.xml.
Module Descriptor
You should configure a unique name for your Commerce Connector Module. It should be reverse-DNS, reflecting your organization and module structure, like com.foo.connectors.foocommerce or com.bloomreach.commercedxp.demo.connectors.mydemoconnector. Bloomreach Accelerator: B2C Commerce will be able to discover your Commerce Connector Module by its name. In the example below, com.bloomreach.commercedxp.demo.connectors.mydemoconnector is the unique module name for the Demo Commerce Connector Module.
<?xml version="1.0" encoding="UTF-8"?>
<module xmlns="http://www.onehippo.org/schema/hst/hst-addon-module_1_0.xsd">
  <name>com.bloomreach.commercedxp.demo.connectors.mydemoconnector</name>
  <config-locations>
    <config-location>classpath*:META-INF/spring-assembly/addon/com/bloomreach/commercedxp/demo/connectors/mydemoconnector/*.xml</config-location>
    <config-location>classpath*:META-INF/hst-assembly/addon/com/bloomreach/commercedxp/demo/connectors/mydemoconnector/overrides/*.xml</config-location>
  </config-locations>
</module>
An HST Addon Module allows to assemble any component beans of your Commerce Connector Module in Spring Bean Assembly XML files through the <config-locations> and <config-location> elements.
CommerceRepository Beans Assembly
Here is an example Spring Bean Assembly file in the Demo Commerce Connector Module:
<?xml version="1.0" encoding="UTF-8"?>
<beans xmlns="http://www.springframework.org/schema/beans"
       xmlns:xsi="http://www.w3.org/2001/XMLSchema-instance"
       xmlns:context="http://www.springframework.org/schema/context"
       xmlns:aop="http://www.springframework.org/schema/aop"
       xsi:schemaLocation="http://www.springframework.org/schema/beans http://www.springframework.org/schema/beans/spring-beans.xsd
                           http://www.springframework.org/schema/context http://www.springframework.org/schema/context/spring-context.xsd
                           http://www.springframework.org/schema/aop http://www.springframework.org/schema/aop/spring-aop.xsd">

  <!--
    The entrypoint component bean, of type c.b.c.api.v2.connector.provider.ConnectorRepositoryProvider,
    through which Bloomreach Accelerator: B2C Commerce retrieves your CommerceRepository components.
  -->
  <bean class="com.bloomreach.commercedxp.demo.connectors.mydemoconnector.repository.MyDemoConnectorRepositoryProviderImpl">
    <property name="commerceRepositoryMap">
      <map>
        <entry key="com.bloomreach.commercedxp.api.v2.connector.repository.CategoryRepository"
               value-ref="categoryRepository" />
        <entry key="com.bloomreach.commercedxp.api.v2.connector.repository.ProductRepository"
               value-ref="productRepository" />
        <entry key="com.bloomreach.commercedxp.api.v2.connector.repository.CustomerRepository"
               value-ref="customerRepository" />
        <entry key="com.bloomreach.commercedxp.api.v2.connector.repository.AddressRepository"
               value-ref="addressRepository" />
        <entry key="com.bloomreach.commercedxp.api.v2.connector.repository.CartRepository"
               value-ref="cartRepository" />
        <entry key="com.bloomreach.commercedxp.api.v2.connector.repository.OrderRepository"
               value-ref="orderRepository" />
      </map>
    </property>
  </bean>

  <bean id="categoryRepository" class="com.bloomreach.commercedxp.demo.connectors.mydemoconnector.repository.MyDemoCategoryRepositoryImpl">
  </bean>

  <bean id="productRepository" class="com.bloomreach.commercedxp.demo.connectors.mydemoconnector.repository.MyDemoProductRepositoryImpl">
  </bean>

  <bean id="customerRepository" class="com.bloomreach.commercedxp.demo.connectors.mydemoconnector.repository.MyDemoCustomerRepositoryImpl">
  </bean>

  <bean id="cartRepository" class="com.bloomreach.commercedxp.demo.connectors.mydemoconnector.repository.MyDemoCartRepositoryImpl">
  </bean>

  <bean id="orderRepository" class="com.bloomreach.commercedxp.demo.connectors.mydemoconnector.repository.MyDemoOrderRepositoryImpl">
  </bean>

  <bean id="addressRepository" class="com.bloomreach.commercedxp.demo.connectors.mydemoconnector.repository.MyDemoAddressRepositoryImpl">
  </bean>

</beans>
After discovering the Commerce Connector Module as an HST Addon Module, Bloomreach Accelerator: B2C Commerce Application retrieves the component bean, of type com.bloomreach.commercedxp.api.v2.connector.provider.ConnectorRepositoryProvider, and retrieves all the available CommerceRepository components through it.
A Commerce Connector Module is responsible for the following:
- It should be packaged in a JAR file as an HST Addon Module, and provide the entry point bean of type com.bloomreach.commercedxp.api.v2.connector.provider.ConnectorRepositoryProvider in its Spring Bean Assembly XML file, through which Bloomreach Accelerator: B2C Commerce Application can have access to the module.
- The ConnectorRepositoryProvider bean is responsible for providing all the available CommerceRepository beans. Applications depends on the ConnectorRepositoryProvider bean to retrieve CommerceRepository components, not trying to retrieve the beans directly.
You can implement a more complex ConnectorRepositoryProvider class if necessary, or you can extend AbstractConnectorRepositoryProvider that provides basic getter and setter methods for the CommerceRepository component beans like the following:
package com.bloomreach.commercedxp.demo.connectors.mydemoconnector.repository;

import com.bloomreach.commercedxp.api.v2.connector.provider.AbstractConnectorRepositoryProvider;

/**
 * Simple ConnectorRepositoryProvider extending AbstractConnectorRepositoryProvider to just set/get CommerceRepository beans.
 * It inherits all the getters and setters for the CommerceRepository beans from AbstractConnectorRepositoryProvider.
 */
public class MyDemoConnectorRepositoryProviderImpl extends AbstractConnectorRepositoryProvider {

}
Implement and Test CommerceRepository
In this tutorial, you'll use a static JSON resource file for the product and category data without having to interact with any real backends at runtime, just for simplicity. The example static JSON resource file is located at src/main/resources/com/bloomreach/commercedxp/demo/connectors/mydemoconnector/demoproducts.json in the project. It looks as follows:
{
  "response":{
    "numFound":10,
    "start":0,
    "docs":[
      {
        "sale_price":49.99,
        "price":49.99,
        "description":"Vestri M-Class logo anchors the signature web stripes racing around the collar of a women's polo cut for comfort from knit stretch cotton.",
        "title":"Women's M-Class Tee",
        "url":"www.elasticpath.com",
        "brand":"",
        "pid":"WOMENS_M-Class_TEE",
        "default_sku": "97115",
        "categories": [
          "VPA_T_MCLASS"
        ],
        "thumb_image":"https://s3-us-west-2.amazonaws.com/elasticpath-demo-images/VESTRI_VIRTUAL/97115.png",
        "sale_price_range":[
          49.99,
          49.99
        ],
        "price_range":[
          49.99,
          49.99
        ]
      },
      {
        "sale_price":35900.0,
        "price":35900.0,
        "description":"Our full size electric/hybrid primum four door sedan gives you the performance of a sports car with the function of a sedan. Perfect for family needing something bigger, but still wanting to feel young at heart. The performance and reliability is such that it's been selected as the de factor electric police car by many governments. It's extended range, options give everything needed for the environmentally conscious service.",
        "title":"X-Class Full Size Premium Sedan",
        "url":"www.elasticpath.com",
        "brand":"",
        "pid":"X-Class-S",
        "default_sku": "10002",
        "categories": [
          "VPA_T_MCLASS"
        ],
        "thumb_image":"https://s3-us-west-2.amazonaws.com/elasticpath-demo-images/VESTRI_VIRTUAL/10002.png",
        "sale_price_range":[
          35900.0,
          35900.0
        ],
        "price_range":[
          35900.0,
          35900.0
        ]
      },
      // SNIP
    ]
  },
  "category_map":{
    "VESTRI_BM_APPAREL":"Apparel",
    "VPA_CHARGING_AND_ADAPTERS":"Charging and Adapters",
    "VPA_TA_T50":"T50",
    "VPA_VA_MCLASS":"M-Class",
    "VPA_VA_T50":"T50",
    "VPA_CA_XCLASS":"X-Class",
    "VPA_T_MCLASS":"M-Class",
    "VESTRI_BM_ACCESSORIES":"Accessories",
    "VESTRI_APPAREL_WOMENS":"Womens",
    "VPA_CA_MCLASS":"M-Class",
    "VPA_T_T50":"T50",
    "VESTRI_APPAREL_MENS":"Mens",
    "VPA_CHARING_AND_ADAPTERS":"Charging and Adapters",
    "VPA_TIRES":"Tires",
    "VPA_VEHICLE_ADDONS":"Addons",
    "VPA_T_XCLASS":"X-Class"
  }
}
The JSON file contains all product item resources in an array in the response/docs node, and all the navigational category map in the category_map node. So, the demo CommerceRepository implementations will be able to provide product and category data based on the static JSON resource, using the following utility class:
package com.bloomreach.commercedxp.demo.connectors.mydemoconnector.repository;

//...

/**
 * Demo Data Loader Utility.
 */
final class MyDemoDataLoader {

    /**
     * Static demo product/category data JSON resource path.
     */
    private static final String MY_DEMO_DATA_RESOURCE = "com/bloomreach/commercedxp/demo/connectors/mydemoconnector/demoproducts.json";

    /**
     * Lazy data loader (ref: https://en.wikipedia.org/wiki/Initialization-on-demand_holder_idiom).
     */
    private static class LazyHolder {

        private static MyDemoData data = null;
        static {
            try (InputStream input = MyDemoDataLoader.class.getClassLoader().getResourceAsStream(MY_DEMO_DATA_RESOURCE)) {
                final ObjectMapper mapper = new ObjectMapper();
                data = mapper.readValue(input, MyDemoData.class);
            } catch (Exception e) {
                e.printStackTrace();
            }
        }
        static final MyDemoData INSTANCE = data;
    }

    private MyDemoDataLoader() {
    }

    /**
     * Return the static MyDemoData instance which is loaded from the static JSON resource.
     */
    static MyDemoData getMyDemoData() {
        return LazyHolder.INSTANCE;
    }
}
CommerceRepository implementations will be able to use MyDemoDataLoader#getMyDemoData() whenever they need to access the internal data.
Implement ProductRepository
Start with implementing ProductRepository. Implement #findOne(...) to retrieve the specific one product item, #findAll(...) to query product items, and #findAllByCategory(...) to list product items in a specific category.
package com.bloomreach.commercedxp.demo.connectors.mydemoconnector.repository;

//...

/**
 * Demo ProductRepository Implementation.
 */
public class MyDemoProductRepositoryImpl extends AbstractProductRepository {

    @Override
    public ItemModel findOne(CommerceConnector connector, String id, QuerySpec querySpec) throws ConnectorException {
        // Retrieve the internal data first.
        final MyDemoData data = MyDemoDataLoader.getMyDemoData();
        final List<MyDemoProductItem> productItems = data.getResponse().getProductItems();

        // For simplicity, just iterate over the items and return it if an item is found by the product code.
        for (MyDemoProductItem item : productItems) {
            if (id.equals(item.getCode())) {
                return item;
            }
        }

        return null;
    }

    @Override
    public PageResult<ItemModel> findAll(CommerceConnector connector, QuerySpec querySpec) throws ConnectorException {
        // Read the pagination params from querySpec.
        final long offset = querySpec.getOffset();
        final long limit = (querySpec.getLimit() != null) ? querySpec.getLimit().longValue()
                : MyDemoConstants.DEFAULT_PAGE_LIMIT;
        // The item collection to be in the return object.
        final List<ItemModel> itemModels = new LinkedList<>();

        final MyDemoData data = MyDemoDataLoader.getMyDemoData();
        final List<MyDemoProductItem> productItems = data.getResponse().getProductItems();

        final long totalSize = productItems.size();
        final long endOffset = Math.min(offset + limit, totalSize);

        // Put only the items in the index range of the specified page.
        for (int index = (int) offset; index < endOffset; index++) {
            itemModels.add(productItems.get(index));
        }

        // Return a paginated result using the common SimplePageResult class with item collection and pagination info.
        return new SimplePageResult<>(itemModels, offset, limit, totalSize);
    }

    @Override
    public PageResult<ItemModel> findAllByCategory(CommerceConnector connector, CategoryForm categoryForm,
            QuerySpec querySpec) throws ConnectorException {
        final long offset = querySpec.getOffset();
        final long limit = (querySpec.getLimit() != null) ? querySpec.getLimit().longValue()
                : MyDemoConstants.DEFAULT_PAGE_LIMIT;
        final String categoryId = categoryForm.getId();

        final List<ItemModel> itemModels = new LinkedList<>();

        final MyDemoData data = MyDemoDataLoader.getMyDemoData();
        // Almost same as #findAll(...), but let's filter the items only for the specific category.
        final List<MyDemoProductItem> productItems = data.getResponse().getProductItems().stream()
                .filter(item -> item.getCategories().contains(categoryId)).collect(Collectors.toList());

        final long totalSize = productItems.size();
        final long endOffset = Math.min(offset + limit, totalSize);

        for (int index = (int) offset; index < endOffset; index++) {
            itemModels.add(productItems.get(index));
        }

        // Return a paginated result using the common SimplePageResult class with item collection and pagination info.
        return new SimplePageResult<>(itemModels, offset, limit, totalSize);
    }
}
This implementation is quite basic, but if you replace some logic with a real backend communication, you will be able to implement something real for a specific Commerce Backend Platform.
Test ProductRepository
Unit testing is important to keep the code quality level high. It is also very helpful for your Commerce Connector Module to be validated at a basic level before spending effort later in the integration testing phase.
Suppose you want to make sure that your ProductRepository implementation works properly based on inputs such as pagination information. You will probably need to instantiate your ProductRepository, make some calls on it to test with various inputs, and finally validate the outcomes in each scenario like the following example:
package com.bloomreach.commercedxp.demo.connectors.mydemoconnector.repository;

//...

/**
 * Unit tests for my ProductRepository implementation.
 */
public class MyDemoProductRepositoryImplTest extends AbstractMyDemoRepositoryTest {

    private ProductRepository productRepository;

    @Before
    public void setUp() throws Exception {
        productRepository = new MyDemoProductRepositoryImpl();
    }

    @Test
    public void testFindAll() throws Exception {
        // Create a mock CommerceConnector instance which simply sets the default (CRISP) resource space name
        // even if CRISP is not used in our demo module. See AbstractMyDemoRepositoryTest#createMockCommerceConnector()
        // for detail on how it can create a mock CommerceConnector and CommerceConnectorComponent instances using EasyMock.
        final CommerceConnector mockConnector = createMockCommerceConnector("mydemoSpace");

        // Create a QuerySpec with default pagination info,
        // and invoke the ProductRepository with that.
        QuerySpec querySpec = new QuerySpec();
        PageResult<ItemModel> pageResult = productRepository.findAll(mockConnector, querySpec);

        // Check the paginated result starting at the zero index.
        assertEquals(0, pageResult.getOffset());
        assertEquals(MyDemoConstants.DEFAULT_PAGE_LIMIT, pageResult.getLimit());
        assertEquals(10, pageResult.getSize());
        assertEquals(10, pageResult.getTotalSize());

        // Also, check the first product item in the result collection.
        ItemModel itemModel = pageResult.iterator().next();
        assertEquals("WOMENS_M-Class_TEE", itemModel.getId());
        assertEquals("97115", itemModel.getCode());
        assertEquals("Women's M-Class Tee", itemModel.getDisplayName());
        assertTrue(itemModel.getDescription().startsWith("Vestri M-Class logo anchors the signature web stripes racing"));
        assertEquals(new BigDecimal("49.99"), itemModel.getListPrice().getMoneyAmounts().get(0).getAmount());
        assertEquals(new BigDecimal("49.99"), itemModel.getPurchasePrice().getMoneyAmounts().get(0).getAmount());
        assertEquals("https://s3-us-west-2.amazonaws.com/elasticpath-demo-images/VESTRI_VIRTUAL/97115.png",
                itemModel.getImageSet().getThumbnail().getSelfLink().getHref());

        // Create a QuerySpec with a specific pagination info in range [5, 10),
        // and invoke the ProductRepository with that.
        querySpec = new QuerySpec(5L, 5L);
        pageResult = productRepository.findAll(mockConnector, querySpec);

        // Check the paginated result starting at the 5th index.
        assertEquals(5, pageResult.getOffset());
        assertEquals(5, pageResult.getLimit());
        assertEquals(5, pageResult.getSize());
        assertEquals(10, pageResult.getTotalSize());

        // Also, check the first product item in the result collection.
        itemModel = pageResult.iterator().next();
        assertEquals("AUTO_DRIVE", itemModel.getId());
        assertEquals("11610", itemModel.getCode());
        assertEquals("AutoPilot", itemModel.getDisplayName());
        assertTrue(itemModel.getDescription().startsWith("All Vestri vehicles produced, have the ability for full self-driving"));
        assertEquals(new BigDecimal("775.0"), itemModel.getListPrice().getMoneyAmounts().get(0).getAmount());
        assertEquals(new BigDecimal("775.0"), itemModel.getPurchasePrice().getMoneyAmounts().get(0).getAmount());
        assertEquals("https://s3-us-west-2.amazonaws.com/elasticpath-demo-images/VESTRI_VIRTUAL/11610.png",
                itemModel.getImageSet().getThumbnail().getSelfLink().getHref());
    }

    // ...

}
Now, you are able to implement, test, and validate your ProductRepository implementation, without having to test everything through a real application deployment from the beginning.
Implement CustomerRepository
To support customer's sign-up, sign-in, and sign-out processes in Bloomreach Accelerator: B2C Commerce Applications, a CustomerRepository implementation should be provided like the following example:
package com.bloomreach.commercedxp.demo.connectors.mydemoconnector.repository;

//...

/**
 * Demo CustomerRepository Implementation.
 */
public class MyDemoCustomerRepositoryImpl extends AbstractCustomerRepository {

    /**
     * Let's keep the customer map by id in-memory here, initially empty.
     * So you need to sign-up first whenever once restarted.
     * Simple enough for the demo.
     */
    private Map<String, MyDemoCustomerModel> customerModelsById = new ConcurrentHashMap<>();

    /**
     * Let's keep the customer map by e-mail in-memory here, initially empty.
     * So you need to sign-up first whenever once restarted.
     * Simple enough for the demo.
     */
    private Map<String, MyDemoCustomerModel> customerModelsByEmail = new ConcurrentHashMap<>();

    @Override
    public CustomerModel findOne(CommerceConnector connector, String id, QuerySpec querySpec) throws ConnectorException {
        // For demo purpose, let's disallow to find customer profile if id is blank.
        if (StringUtils.isBlank(id)) {
            throw new IllegalArgumentException("Blank customer id.");
        }

        CustomerModel customerModel = customerModelsById.get(id);

        if (customerModel == null) {
            throw new ConnectorException("401", "Customer not authenticated.");
        }

        return customerModel;
    }

    @Override
    public PageResult<CustomerModel> findAll(CommerceConnector connector, QuerySpec querySpec) throws ConnectorException {
        throw new UnsupportedOperationException();
    }

    @Override
    public CustomerModel save(CommerceConnector connector, CustomerForm resourceForm) throws ConnectorException {
        // For demo purpose, let's disallow to save customer profile if e-mail address is blank.
        if (StringUtils.isBlank(resourceForm.getEmail())) {
            throw new IllegalArgumentException("Blank customer E-Mail address.");
        }

        // Retrieve an existing customerModel from the in-memory map.
        final MyDemoCustomerModel customerModel = customerModelsByEmail.get(resourceForm.getEmail());

        // If not existing, no customer exists in our demo.
        if (customerModel == null) {
            throw new ConnectorException("404", "Customer not found.");
        }

        // Let's update the model directly in the in-memory map.
        customerModel.setFirstName(resourceForm.getFirstName());
        customerModel.setLastName(resourceForm.getLastName());

        return customerModel;
    }

    @Override
    public CustomerModel create(CommerceConnector connector, CustomerForm resourceForm) throws ConnectorException {
        // For demo purpose, let's disallow to sign up customer if e-mail address is blank.
        if (StringUtils.isBlank(resourceForm.getEmail())) {
            throw new IllegalArgumentException("Blank customer's E-Mail address.");
        }

        // Let's create a customer model with a random ID and setting the other properties by the input.
        final MyDemoCustomerModel customerModel = new MyDemoCustomerModel(UUID.randomUUID().toString());
        customerModel.setEmail(resourceForm.getEmail());
        customerModel.setFirstName(resourceForm.getFirstName());
        customerModel.setLastName(resourceForm.getLastName());
        // setting a visitor specific access token, just for demonstration purpose, but will not be used in this demo.
        customerModel.setAccessToken(UUID.randomUUID().toString());

        // OK, let's register the new customer model in the in-memory map.
        customerModelsById.put(customerModel.getId(), customerModel);
        customerModelsByEmail.put(resourceForm.getEmail(), customerModel);

        return customerModel;
    }

    @Override
    public CustomerModel delete(CommerceConnector connector, String resourceId) throws ConnectorException {
        // We don't support customer removal in this demo.
        throw new UnsupportedOperationException();
    }

    @Override
    public CustomerModel checkIn(CommerceConnector connector, CustomerForm resourceForm) throws ConnectorException {
        // For demo purpose, let's disallow to sign in customer if e-mail address is blank.
        if (StringUtils.isBlank(resourceForm.getEmail())) {
            throw new IllegalArgumentException("Blank customer's E-Mail address.");
        }

        // CustomerRepository#checkIn(...) is invoked when Bloomreach Accelerator: B2C Commerce Application wants the customer to sign in.
        // For simplicity in our demo, let's just the customer signed in without having to check the password
        // if the customer model is found in the in-memory map.
        final MyDemoCustomerModel customerModel = customerModelsByEmail.get(resourceForm.getEmail());

        if (customerModel == null) {
            throw new ConnectorException("401", "Customer not authenticated.");
        }

        return customerModel;
    }

    @Override
    public CustomerModel checkOut(CommerceConnector connector, CustomerForm resourceForm) throws ConnectorException {
        // For demo purpose, let's disallow to sign out customer if e-mail address is blank.
        if (StringUtils.isBlank(resourceForm.getEmail())) {
            throw new IllegalArgumentException("Blank customer's E-Mail address.");
        }

        // More advanced Commerce Connector Module might want to update the customer states in the backend
        // when a customer wants to sign out.
        // But in our demo, let's just return the customer model for simplicity.
        return customerModelsByEmail.get(resourceForm.getEmail());
    }
}
Test CustomerRepository
Here is an example unit test code for the CustomerRepository implementation:
package com.bloomreach.commercedxp.demo.connectors.mydemoconnector.repository;

//...

/**
 * Unit tests for my CustomerRepository implementation.
 */
public class MyDemoCustomerRepositoryImplTest extends AbstractMyDemoRepositoryTest {

    private CustomerRepository customerRepository;

    @Before
    public void setUp() throws Exception {
        customerRepository = new MyDemoCustomerRepositoryImpl();
    }

    @Before
    public void testCheckInWithoutSignup() throws Exception {
        // Create a mock CommerceConnector instance which simply sets the default (CRISP) resource space name
        // even if CRISP is not used in our demo module. See AbstractMyDemoRepositoryTest#createMockCommerceConnector()
        // for detail on how it can create a mock CommerceConnector and CommerceConnectorComponent instances using EasyMock.
        final CommerceConnector mockConnector = createMockCommerceConnector("mydemoSpace");

        // Create a simple CustomerForm which is passed along from an application to the CustomerRepository,
        // with customer sign-in information.
        SimpleCustomerForm resourceForm = new SimpleCustomerForm("[email protected]", "password", "mystore");

        try {
            // This sign-in attempt should fail because there's no signed-up customer initially.
            customerRepository.checkIn(mockConnector, resourceForm);
            fail("Not supposed to sign-in by non-registered user.");
        } catch (ConnectorException expected) {
        }
    }

    @Before
    public void testCheckInOutAfterSignup() throws Exception {
        // Create a mock CommerceConnector instance which simply sets the default (CRISP) resource space name
        // even if CRISP is not used in our demo module. See AbstractMyDemoRepositoryTest#createMockCommerceConnector()
        // for detail on how it can create a mock CommerceConnector and CommerceConnectorComponent instances using EasyMock.
        final CommerceConnector mockConnector = createMockCommerceConnector("mydemoSpace");

        // Create a simple CustomerForm which is passed along from an application to the CustomerRepository,
        // with customer sign-up information.
        SimpleCustomerForm resourceForm = new SimpleCustomerForm("John", "", "Doe", "[email protected]", "password", "password", null);
        // When a customer signing up, Bloomreach Accelerator: B2C Commerce Application invokes CustomerRepository#create(...) operation.
        CustomerModel customerModel = customerRepository.create(mockConnector, resourceForm);

        // Let's validate the sign-up outcome, which should be a valid CustomerModel object
        // with the same values given by the CustomerForm object.
        assertEquals("John", customerModel.getFirstName());
        assertEquals("Doe", customerModel.getLastName());
        assertEquals("[email protected]", customerModel.getEmail());

        // All right. Let's try to sign-in with the customer.
        resourceForm = new SimpleCustomerForm("[email protected]", "password", "mystore");
        // When a customer signing in, Bloomreach Accelerator: B2C Commerce Application invokes CustomerRepository#checkIn(...) operation.
        customerModel = customerRepository.checkIn(mockConnector, resourceForm);

        // Let's validate the sign-in outcome, which should be a valid CustomerModel object.
        assertEquals("John", customerModel.getFirstName());
        assertEquals("Doe", customerModel.getLastName());
        assertEquals("[email protected]", customerModel.getEmail());

        // Now, let's sign-out.
        // When a customer signing out, Bloomreach Accelerator: B2C Commerce Application invokes CustomerRepository#checkOut(...) operation.
        customerModel = customerRepository.checkOut(mockConnector, resourceForm);

        // Let's validate the sign-out outcome, which should be the same valid CustomerModel object again.
        assertEquals("John", customerModel.getFirstName());
        assertEquals("Doe", customerModel.getLastName());
        assertEquals("[email protected]", customerModel.getEmail());
    }
}
Now, you are able to implement, test, and validate your CustomerRepository implementation, without having to test everything through a real application deployment from the beginning.
The Rest
You can find other implementations and test cases in the Demo Commerce Connector Module project located at https://github.com/onehippo/demo-commerce-connector. For example, Example CartRepository implementation and its test case. Fork it and put your hands in.
Integration Testing
Once you validated everything with your CommerceRepository implementations and their unit tests based on the Commerce Connector SDK APIs, you will need to test the module with Bloomreach Accelerator: B2C Commerce Application. By adding the module dependency and configuring your module in the Bloomreach Accelerator: B2C Commerce Boot project, you can perform an integration test.
Add Commerce Connector Module Dependency
First, add the dependency of your Commerce Connector Module to cms-dependencies/pom.xml of the Bloomreach Accelerator: B2C Commerce Boot project like the following (using the Demo Commerce Connector Module in this case):
    <dependency>
      <groupId>com.bloomreach.commercedxp.demo.connectors</groupId>
      <artifactId>mydemoconnector</artifactId>
      <version>2.1.0</version>
    </dependency>
Build and Start
Build the Bloomreach Accelerator: B2C Commerce Boot project:
$ mvn clean verify
Run the Bloomreach Accelerator: B2C Commerce Boot project:
$ mvn -P cargo.run
Now you can move on to registering your Commerce Connector Module through a configuration document.
Register Connector
A new Commerce Connector Module must be registered through a Commerce Connector document in CMS. Navigate to the adminitration/commerce-connectors folder and create a new Commerce Connector document with the name. e.g, "mydemo" for the Demo Commerce Connector Module.
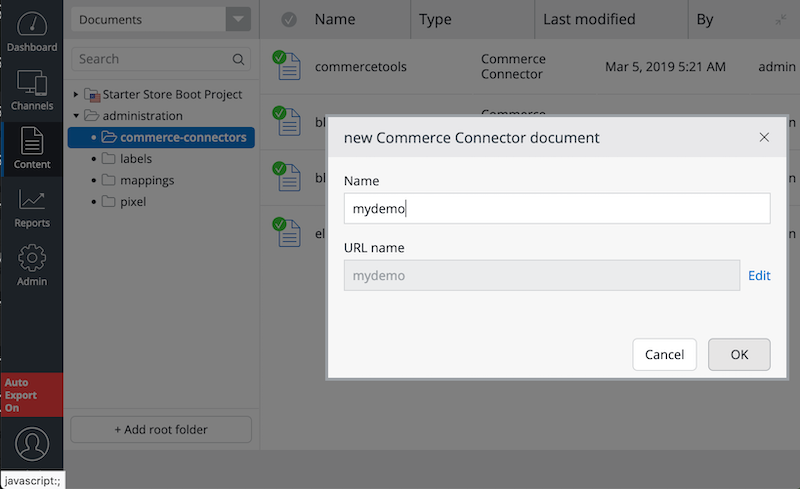
As shown in the screenshot below, enter "mydemo" again for the Connector ID field, which will be used as a unique identifier of the Commerce Connector in the system.
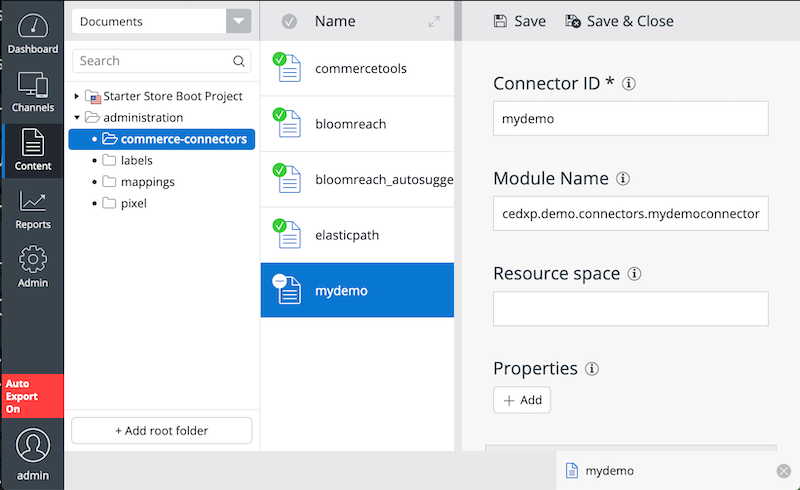
In the Module Name field, enter the the module name that you specified in the module descriptor at META-INF/hst-assembly/addon/module.xml; com.bloomreach.commercedxp.demo.connectors.mydemoconnector in the Demo Commerce Connector Module project.
You may keep the Resource space field empty for now as we don't use CRISP API in this example (yet). When you need to use CRISP API in your Commerce Connector Module, you should enter the specific CRISP resource space name in the field.
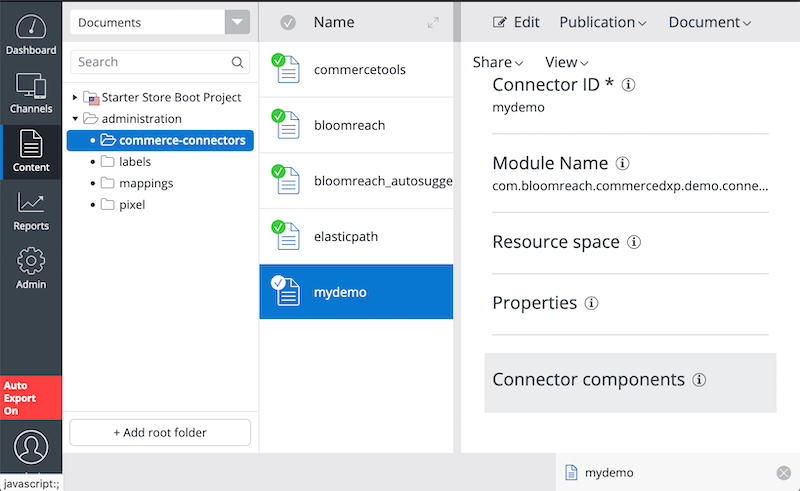
Publish the Commerce Connector document. Now your new Commerce Connector Module named "mydemo" becomes active in the system.
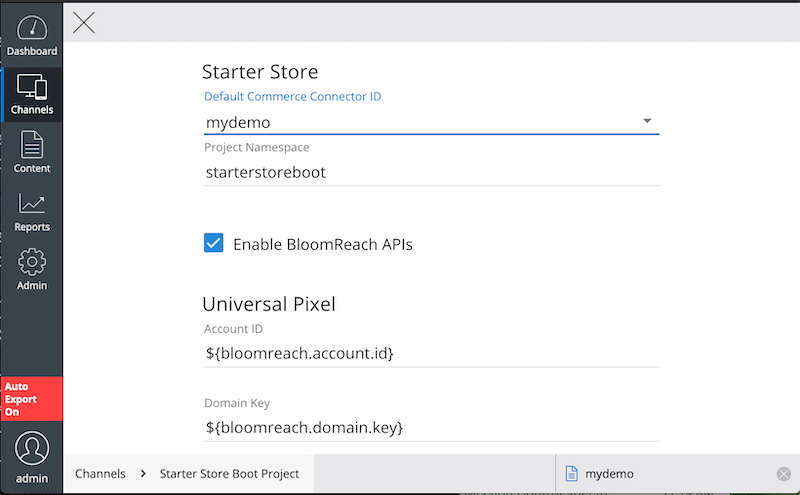
Set Default Connector for Channel
Navigate to the Channel Manager and edit the channel settings. In the Bloomreach Accelerator: B2C Commerce channel setting section, select "mydemo" as the default Commerce Connector for the channel. Publish the channel so that the delivery tier application will be activated with the channel configuration change. Moreover, don't forget to disable the Bloomereach APIs.
Visit Delivery Application
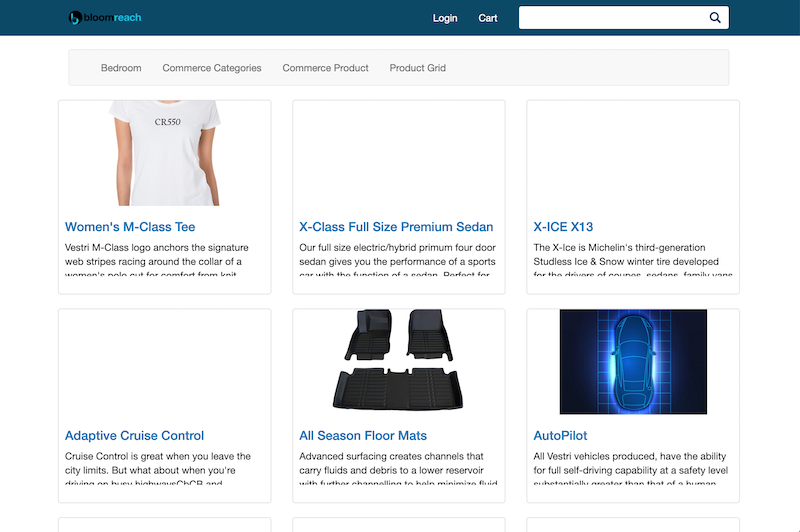
Visit the delivery tier application at http://localhost:8080/site/, and select the Product Grid menu. You will see the product grid page which is filled with the product resources from the Demo Commerce Connector Module.
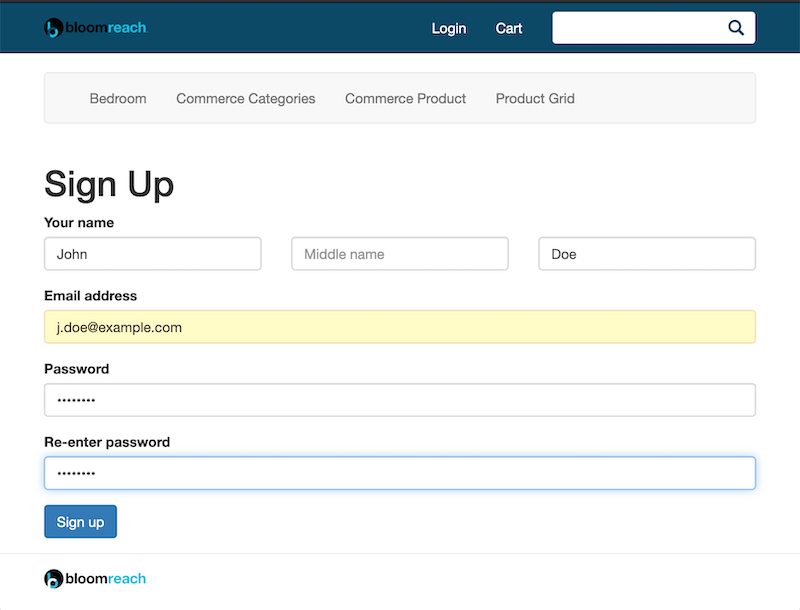
Customer Sign-up
Now, let's test customer sign-up and sign-in features. Click on the Login link and Sign up link afterward in the login page.
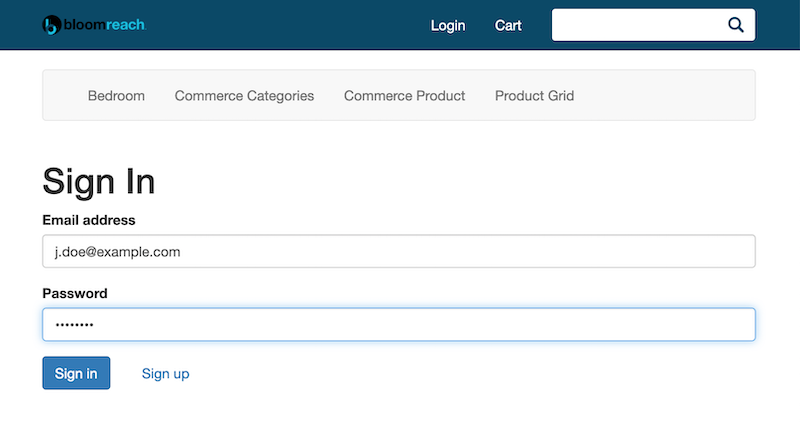
Customer Sign-in
Once you signed up, you may proceed to sign in the system.
Product Grid Page
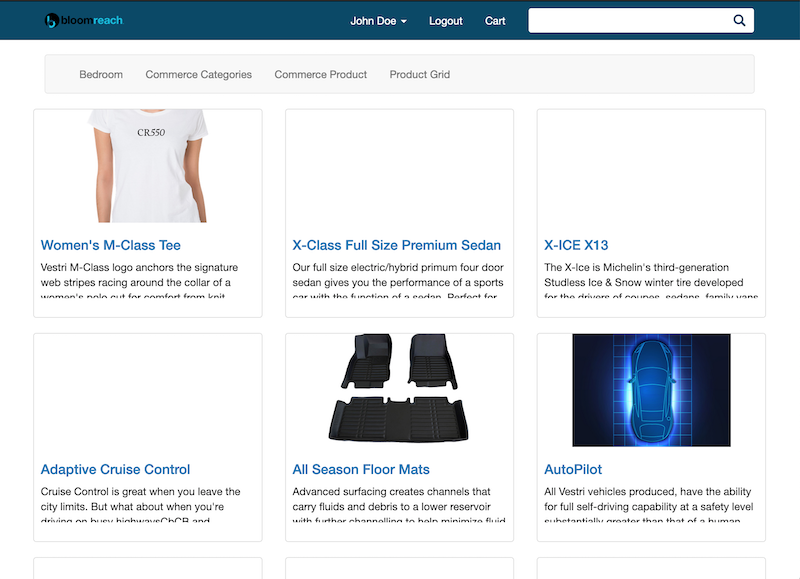
Let's visit the Product Grid page again. You will see the same data as seen before. Also, you are recognized as an authenticated customer now.
Click on a product item in the grid, and you will navigate to the product detail page.
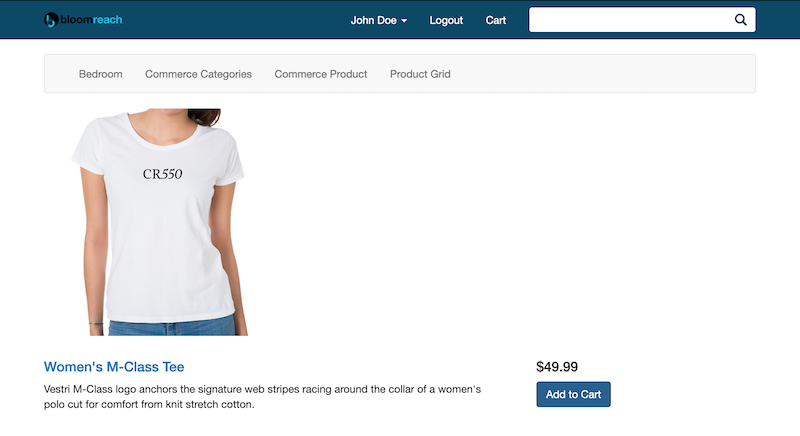
Product Detail Page and Add to Cart
In the product detail page, you will be able to add the product item to your cart now.
If you click on the Cart menu, you will be able to browse your cart entries and update or delete each entry.
Summary
You can develop a Commerce Connector Module to integrate a Commerce Backend Platform with Bloomreach Accelerator: B2C Commerce Application seamlessly, by following the guides and examples in the Demo Commerce Connector Module project located at https://github.com/onehippo/demo-commerce-connector. Not only does the demo project explain how to implement the CommerceRepository components, it also gives concrete ideas on how to test your components with unit tests for basic validations, without having to test everything through deployed applications from the beginning. Performing integration tests for your Commerce Connector Module with the Bloomreach Accelerator: B2C Commerce Boot project is also straightforward.