Configure Domains
Introduction
Goal
Direct incoming traffic for a domain to the appropriate environment and webapp.
Background
The domain configuration allows Bloomreach Cloud to route incoming traffic for a domain name to the appropriate environment. This is very useful when using the blue-green deployment model. Changing the environment reference in Mission Control is sufficient to direct traffic to the other environment with immediate effect.
You have two options for adding new domains or sub-domains;
Using your reserved bloomreach.cloud URL segment (Option 1)
Each Bloomreach Cloud stack will have a reserved URL segment ex. *.customer.bloomreach.cloud. For example, a customer with stack name bankpoc, will have *.bankpoc.bloomreach.cloud url segment reserved.
bloomreach.cloud customer domains can be added either via Mission Control UI, or Bloomreach Cloud API.
Some examples of domains for customer "bankpoc":
blue.bankpoc.bloomreach.cloud
green.bankpoc.bloomreach.cloud
dev.bankpoc.bloomreach.cloud
test.bankpoc.bloomreach.cloud
Using your own provided domain or sub-domain (Option 2)
Example, www.customer.com.
Prerequisites and Constraints
For both Option 1 and Option 2:
-
Make sure you have created a distribution and you have at least 1 environment deployed in the Mission Control.
-
Before adding a domain, the delivery tier for your environment must have a corresponding virtual host configuration for that specific domain.
-
If you do not want caching enabled for any reason, please reach out to our support team and request that the caching is turned off for your domain. To understand our default caching behaviour please go to official Cloudflare documentation. Bloomreach Cloud is integrated with Cloudflare "Enterprise" tier solution.
Only valid for Option 1:
- You sub-domain and environments cannot share the same name. For example, you cannot add blue.customer.bloomreach.cloud domain if you have environment named "blue" in your mission control. This will fail because the platform will already generate few links for you automatically (Site, CMS, Console and Repository).
Only valid for Option 2:
- If you want to have your site available at the apex domain see the Bloomreach Cloud FAQ page. Both the apex domain and subdomain must be added as separate entries in Mission Control.
- Every domain you wish to use in Bloomreach Cloud must have a valid SSL certificate. Bloomreach has the option to manage your SSL certificates through the Let's Encrypt certificate authority, which is preferred. Please note that you will be required to add TXT or CNAME validation records in your autoritative DNS zone in order to prove domain ownership and/or allow for automatic certificate renewal. You can however provide your own certificate if you wish to do that by raising a support request. For instructions on how to share your certificate please follow the guide: Provide SSL certificate.
Instructions
Configure a New Domain
For Option 1:
There is no additional work involved if you plan to use your bloomreach.cloud reserved sub-domains. You can start adding the reserved domain immediately via Mission Control UI or Bloomreach Cloud API.
For Option 2:
In case you would like to use your own domain, you are required to open a support request with the following information:
- Case subject: Ex: Custom domain request
- Case description with the following information:
- Domain name. Example: A wildcard domain: *.customer.com
- Certificate management: "Fully managed with Let's Encrypt CA" (default option), or your own provided certificate). Example: Preferred CA: Fully managed with Let's Encrypt
- Caching (Enabled / Disabled): Example: Caching: Enabled
- Attachments: If preferred certificate management is a private cert, please follow the guide: Provide SSL certificate and attach the encrypted certs to the support case.
Make sure to configure the virtual host for the domain in the environment to which you want traffic for that domain to be directed. Example domain: somesubdomain.customer.com
If you have chosen the fully managed certificates option, make sure you have access to your domain registrar / DNS zone to add TXT / CNAME records for validation.
Add a CNAME record in your DNS zone as seen below:
somesubdomain.customer.com. 300 IN CNAME api.<your-stack-name>.bloomreach.cloud
From this point on, after the configurations are done, support team will send you instructions:
- In case you provided your own certificate, support will notify you after the certificates are validated and successfully installed.
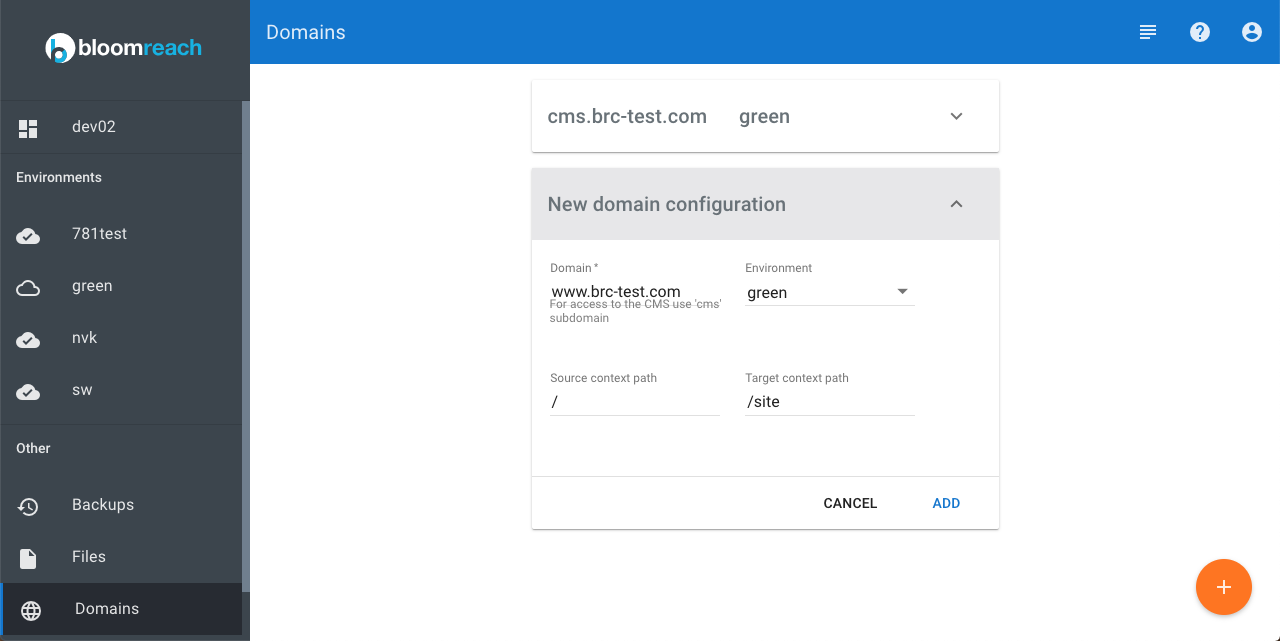
After receiving the confirmations Log in to Mission Control and navigate to Domains.
Click on the + button in the bottom right corner to add a domain.
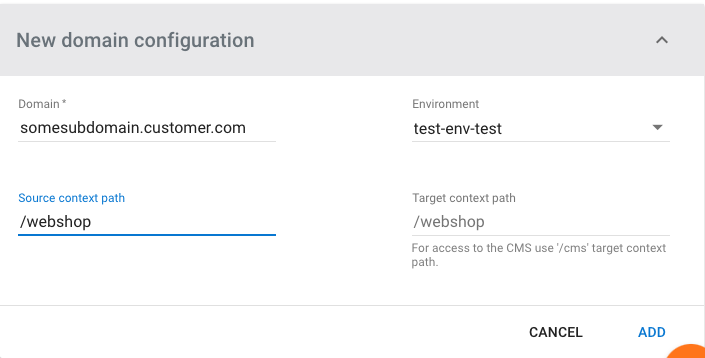
Enter the domain name (for example, somesubdomain.customer.com) and select the environment to which you want traffic for that domain to be directed.
If you would like to serve site traffic please leave the default values for Target context path (/) and Source context path /site unless you are running multiple site webapps (see below).
In case you would like to add a custom domain for your CMS access (for example, cms.customer.com) leave Source context path at its default value (/) and set Target context path to /cms.
Click on Save.
Switch Domain Between Blue and Green Environments
Make sure the environment you want to switch the domain to has the corresponding virtual host configured.
Log in to Mission Control and navigate to Domains.
Select the domain you want to switch.
In the Environment dropdown, select the environment you want to switch to.
Click on Save.
Do the same for the corresponding domain for the CMS application in case you have CMS domain configured.
Configure Domains for Multipe Site Webapps
In case of multiple site webapps running in one environment, for each additional site webapp, configure an additional domain and source and target context paths.
The configured source context path will be the path after the domain name in the URL browser clients should use to request the site.
The configured target context path will be the actual context path of the webapp.
The source should be either empty or the same as the target. By default, an empty source path (/) is mapped to the target path /site.
For example, if you add a second site webapp called webshop to the example above (cms.customer.com and somesubdomain.customer.com), add another domain for somesubdomain.customer.com but with source path webshop and target path webshop. This will make the webshop site webapp available at somesubdomain.customer.com/webshop/.